Reading time: 16 minutes
Published: September 12, 2024
Modified: January 11, 2025
Making the switch to solar energy is more than just an environmentally conscious choice—it’s a smart financial decision. By cutting energy costs with solar panels, you not only reduce your carbon footprint but also open the door to significant long-term savings. This blog dives into how you can lower your energy bills while enjoying the benefits of renewable energy.
Overall, the process, from installation to the benefits I’ve reaped, has made going solar a truly valuable experience.
Key Takeaways
- Solar panels significantly cut down on electricity bills.
- Monitoring and maintaining panels is easy with mobile apps.
- Tax credits and cost savings make solar a smart investment.
Getting Started with Solar
Choosing the Right Installer
Finding the right installer is crucial. Financial stability is a major factor to consider. Some companies may go bankrupt, leaving you with little support. I looked for installers with a solid track record and positive reviews.
Country of origin of the panels might matter to you. My panels happen to be from South Korea. Some prefer panels made regionally to support the local job market. I researched and asked about the warranty periods and services offered. Recommendation from friends who had already installed solar was helpful.
I chose Sunrun ↗, partly because I was constantly being introduced to them while shopping through Costco. One fine day, I decided to stop and chat with the sales representative, and he convinced me to learn more about their products and services. I did reach out to one other installer, but based on a preliminary discussion with them about the cost and the process, I decided not to go with them. Frankly, I should have reached to at least one more installer, but I convinced myself that having Costco’s backing gave me the confidence to go with Sunrun.
The Process Begins
Very shortly after that encounter in Costco, a very friendly and knowledgable salesperson (Terry) gave me an introductory call to discuss an overview of the entire process. First and foremost, Terry had to determine if I was a good candidate for solar:
- What was my yearly electricity consumption? Terry asked to see my utility bills to determine this.
- What was I trying to accomplish? Did I want to cut my electrically bill by 50%, 100% (also known as net zero), or beyond net zero? When you generate more electricity than you consume, the utility pays you rather than vice-versa because you’re putting excess electricity back onto the grid.
- What was my utility plan, and what pricing tiers did I reach? Most every month, I consumed the allotment of Tier 1 electricity and ended up in Tier 2. The higher the tier, the more you pay per kilowatt-hour (kWh). For more information, see Your Electric Bill: Understanding Your Home Energy Use.
- What was my roof made out of, and how old was it? Certain materials, like slate, can become brittle over time making it difficult to install the solar panels without damaging the roof.
- How much viable roof “real estate” did I have? Most installers have satellite views of your roof, so that can easily assess whether you’re a good candidate for solar based on the area and direction of your roof. My roof is very angular with at least one section facing in each direction. Ideally, you’d want the panels to face south and west, with north being the least desirable.
- Are there any trees shading the roof, particularly on the south and west sides?
After Terry determined that I would be a good candidate for solar, we discussed cost and financing options (see Financing Your Solar Panels). Terry gave me a total estimate that turned out to be within 5% of the final cost.
One constant and reassuring message I heard from Terry was that I was not committed to the panels until we had reached a certain milestone. I vaguely remember that milestone being the beginning of the installation, but it might have been slightly before that. Make sure you fully understand exactly when you’re committed to pay for the system!
Performing a Site Assessment
The installation process begins with a site assessment. An assessor (Chris) arrived at my home with a drone that hovered automatically over my house and the surrounding area for about 10 minutes; it was incredible to watch. Chris said that the drone uses artificial intelligence (AI) and GPS to survey the roof and its surroundings.
Designing the System
The next step is designing the system. This involves deciding on the number of panels and their placement. I told Terry that my goal was to get close to net zero, which would require a system that could generate about 4000 W, or 4 kW. Based on the west-facing roof segment where the panels would be installed, he selected nine 410-W panels, yielding a maximum output of about 3700 W.
The panels are nicely arranged in a 3×3 grid as seen in this rendering from Sunrun, which was based on pictures taken from the drone:

While an aesthetic layout of the panels wasn’t a factor in my decision making, I was glad that individual panels weren’t strewn all over the roof. To me, that detracts a bit from the curb appeal of the house.
After reviewing and approving all of the plans, Terry provided me with a detailed contract that outlined the project timeline, costs, and materials to be used. A project manager was assigned to me, and all communications related to the project came from her.
Navigating Permits and Permissions
Obtaining permits is a critical part of the process. Sunrun handled all of the paperwork, which included applying for building permits and permissions from my utility provider, PG&E ↗. This took about 2-3 weeks.
A Net Energy Metering (NEM) agreement in California was also part of this process. This allows me to send excess power generated by my panels back to the grid, earning credits on my electricity bill. As described by the Clean Energy Alliance ↗, “under NEM 2.0, net metering policies have a one-to-one offset, meaning the price of a kWh supplied to the grid is equal to the price of pulling a kWh off the grid. NEM 3.0 will change this price ratio.”
At the time of my agreement in California, NEM 2.0 was in place; all agreements after April 14, 2023 are under NEM 3.0. NEM 3.0 reduces the price the utility pays you for your excess electricity generation. Unfortunately, this has put a damper on solar installations in California.
The National Renewable Energy Laboratory ↗ (NREL) can be a good resource for understanding local requirements and incentives.
Financing Your Solar Panels
Deciding how to pay for solar panels involves choosing between paying in cash, financing to own, or opting for a company-owned system. Understanding the pros and cons of each option, and knowing how to maximize available incentives, can help make the process smoother and more affordable.
Exploring Financing Options
When it came time to finance my solar panels, I had a few choices:
- Paying in full with cash was one option. By doing this, I avoided paying interest on a loan and owned the system outright immediately. This choice saved me money in the long run, but the big upfront cost was a drawback.
- A more budget-friendly option was a solar loan. With a loan, you finance the installation and repay it over time. The interest rates on a solar loan through Sunrun’s financing partner were very reasonable (about 4% less than the typically rate for a 30-year mortgage). However, you should be aware of potential hidden costs and carefully evaluate the terms of any financing agreement. Comparing the cash price with the financed price and understanding all associated fees can help you make informed decisions and avoid overpaying for your solar system.
- Another option you can consider is a solar lease. In this scenario, the company owns the panels, and you paid a monthly fee. You don’t need a large sum of money upfront, but you also don’t reduce your electricity bill as much as you would have if you owned your system.
Each option had its benefits and drawbacks, so it’s essential to weigh them carefully.
Maximizing Incentives and Tax Credits
To make my investment as cost-effective as possible, I took advantage of various incentives and tax credits. One significant incentive was the 30% tax credit ↗ provided by the Inflation Reduction Act. This helped reduce my taxable income based on the installation cost.
Some states offer rebates, making the installation more affordable. You might be able to benefit from specific programs aimed at promoting renewable energy, which substantially offset the initial costs. Unfortunately, California no longer had such rebates when I purchased my solar system.
Home equity loans or a home equity line of credit (HELOC) can be helpful for some homeowners. These options let you borrow against the equity in your home at potentially lower interest rates than other types of loans.
Additional Cost Savings
In addition to the 30% federal tax credit, I was able to reduce the upfront costs in a couple of ways:
- Costco offered a 10% rebate. However, I later learned that the rebate is on the cost of the supplies, not the labor, including the panels, inverter, and mounting hardware.
- I spread the payment across two credit cards. My Costco Visa and a second Visa provided a 4% and 2% rebate, respectively.
Installation
The installation of the entire system started on a Saturday and was supposed to finish the next day. However, due to a labor shortage, the work didn’t start again until the following Saturday, when it was completed. All of the panels and hardware were delivered early in the morning of the installation.
While one team was installing the mounting hardware and panels on the roof, another team was installing the inverter (for more information on the inverter, see Utilizing Technology for Performance Tracking). The inverter was installed on the outside of the house directly opposite the circuit breaker, which is mounted on the inside of the garage. It was connected to the circuit breaker and the utility grid.
After testing the installation, the system was ready to go and immediately starting generating electricity. As the smart meter was right next to the inverter, I was elated to see that the meter was reading -1.8 kW. That meant the system was generating more power than I was consuming in the house! If I had an older analog meter with a dial that rotates, I would have seen it rotate in the opposite direction.
The next step managed by Sunrun was to have the system inspected by the city. This is required before PG&E, or any other utility, will grant you Permission to Operate (PTO). The utility rightfully wants to ensure that no harm is done to the electrical grid by your system. Here’s where the waiting began—it took about three months before PTO was granted. At that time, my True-up date was set, and I was not billed for electricity until the True-up date arrived on year later.
Summary of Net Cost of System
Here’s a summary of the net cost of the complete system, including parts and labor:
| Item | Cost |
|---|---|
| Installation and labor | $13,563 |
| Solar panels | $2,376 |
| Inverter | $1,736 |
| Federal tax credit (30%) | ($5,310) |
| Costco shop card rebate (10%) | ($411) |
| Credit card rebates (~3% blended rate) | ($530) |
| Net cost | $11,424 |
Monitoring and Maintenance
For the most part, after your solar panels are operating, there’s really not much that you need to do to other than monitor their performance occasionally. Sunrun also monitors their performance and will reach out to you if they notice that your panels are not performing as expected.
Utilizing Technology for Performance Tracking
Monitoring the performance of your solar panels is important to ensure they’re operating as specified. Sunrun provides a mobile app that gives me an overview of my system’s performance. However, this app doesn’t provide real-time usage data; you find out your total system output one day later. For real-time monitoring, I use another app from the inverter company, SolarEdge ↗. This one provides real-time and historical performance data and alerts me to any problems immediately.
I’ve included some screen captures from the SolarEdge app for my system (from left to right):
- Real-time power generation——the system was generating 2400 W at around noon.
- Production on a sunny day—the ramp-up of power was very smooth as the sun rose and set.
- Production on a partly cloudy day—the ramp-up of power was erratic as the cloud cover occasionally blocked the sun.
- Total power generation per panel—the panels are mounted on a 23-degree angle toward the west, so the energy output of each panel will differ slightly depending on the time of day. This is a great way for me to ensure that all panels are operating. The green device is the inverter ↗; 8.35 kWh represents the total generation of the panels.
- Yearly power—shows the monthly power generation by year. The power generation in 2023 was higher than 2024 so far. However, since some months in 2024 are higher than those in 2023, I’m assuming the panel production has not started to degrade, which eventually will occur over time.

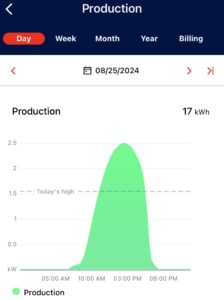
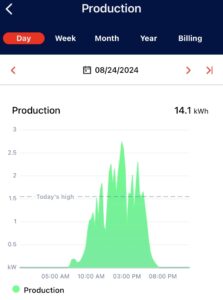
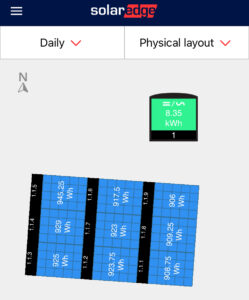
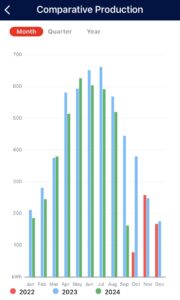
Using these apps, I can track how much electricity my panels are generating and compare it to my usage. This helps me make adjustments to keep my energy costs low. Staying informed about my system’s performance helps me get the most savings from my solar investment.
Keeping Your Solar Panels Efficient
Dust, debris, and dirt can settle on the panels, reducing their efficiency. I found it helpful to clean them a few times during the summer, when it rarely rains in California. A simple rinse with water early in the morning usually does the trick. There are professional services available, which I might use in the future. For now, I find that handling the basic cleaning myself saves money.
Understanding Efficiency and Power Output
- It important to understand that your solar power system will not generate its theoretical maximum output (in my case, that’s 3700 W):
- Your panels and inverter will never be operating at 100% efficiency, so expect a slight degradation in performance from their specified rating.
- The orientation of your panels on the roof might be less than ideal, though your installer will orient them as best as possible.
- Solar panel performance will degrade over time. Today’s panels are expected to last 20-25 years, but at year 25, they will surely generate less power than in year one.
- As previously mentioned, dust, debris, and dirt can settle on the panels, reducing their efficiency.
The highest peak power my system has ever generated was about 3500 W, but that level is rare and often not sustained. In the northern hemisphere, cloudless summer days will generate the most power, usually in July; December and January generate the least power when the sun is lower in the sky.
Benefits of Solar Energy
Switching to solar energy offers both economic and environmental benefits. These advantages can lead to significant savings on your electricity bills and help in reducing your carbon footprint.
Economic Advantages for Homeowners
Installing solar panels can significantly decrease your monthly electricity bill. With solar panels, I managed to get close to net zero, meaning my energy production nearly covers my energy consumption. Most utilities, like PG&E, perform a “true-up” once a year to assess net usage; you do not pay for electricity on a monthly basis. On my first true-up in January 2024, I ended up owing PG&E $50 for my electricity service for the entire year!
- Now, let’s calculate how long it will take for my investment to pay for itself:
- PG&E’s current price per kWh varies depending on your plan, but let’s assume an average rate of $0.43. (Hawaii and California have the highest electricity rates in the United States.)
- My total power generation in 2023 was 5170 kWh, which equates to $0.43 x 5000 = $2,223
- My net cost previously calculated was $11,424.
- Dividing my net cost by the value of my power generation yields the years it will take for my investment to pay for itself: $11,424 / $2,223 = 5.1 years.
After about 5 years, I will enjoy having “free” electricity for at least the next 20 years! Of course, the efficiency of the panels will go down, but you can be sure that the price of electricity will go up, making that a wash.
Furthermore, if I sell my house in the future, the tax basis of the house will increase by the net cost of the system (total price less the tax credit, which is $12,372). At a tax rate of about 20%, I can expect to save about $2,474 in taxes.
Finally, an article from Forbes Home, Do Solar Panels Increase Your Home’s Value? ↗, suggests that solar energy can also increase your house value and help you sell it faster.
Environmental Impact
Solar energy is renewable and abundant. It’s a sustainable way to power your home without depleting natural resources. Unlike fossil fuels, the sun provides an endless energy supply, making it a reliable option for future generations.
If you cannot afford solar panels, but would like to reduce your carbon footprint, community solar projects offer another way to do so, and you might even save money in the process. These projects allow you change the mix of power-generating sources toward greener sources like solar and wind power.